この記事は3年以上前に書かれた記事で内容が古い可能性があります
macを買って真っ先にやったこと
2018-05-04
macを買って真っ先にやったことメモ。
今回は、time machineから復旧せず、一からセットアップした。
zshの設定
まずはシェルの変更。いつもzshを使っていたのでbashから変更する。
シェルの確認
$ cat /etc/shells
# List of acceptable shells for chpass(1).
# Ftpd will not allow users to connect who are not using
# one of these shells.

/bin/bash
/bin/csh
/bin/ksh
/bin/sh
/bin/tcsh
/bin/zsh
シェルの変更
$ chsh -s /bin/zsh
Changing shell for yoshi.
Password for yoshi:
$
この後Terminalを再起動する
~/.zshrcも作成して設定を色々記述する。
% touch ~/.zshrc
PROMPTの設定は以下にしている。
PROMPT="%{${fg[green]}%}[%n@%DT%*]%{${reset_color}%} %~
%# "
すると以下のようにプロンプトが表示される。
[yoshi@18-05-04T21:57:15] ~
%
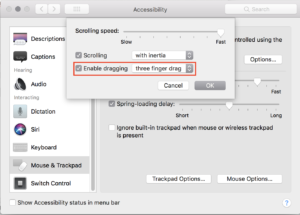
3本指ドラッグの有効化
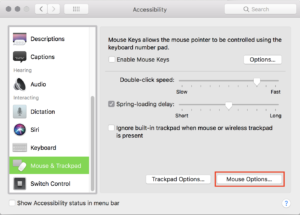
地味に大事な設定。「accessibility」から設定する。
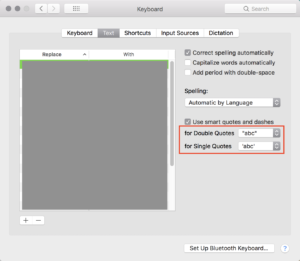
quotesの設定
これはもはや好みの問題だが、「”」ではなく、デフォルトで「”」となるように設定。
.vimrcの設定
~/.vimrcも作成して、設定を記載する。
% touch ~/.vimrc
set number
set title
set paste
set ambiwidth=double
set tabstop=4
set expandtab
set shiftwidth=4
set smartindent
set list
set nrformats-=octal
set hidden
set history=50
set virtualedit=block
set whichwrap=b,s,[,],<,>
set backspace=indent,eol,start
set wildmenu
syntax on
homebrewのインストール
Macのパッケージ管理ツール。
https://brew.shにしたがって、インストールする。
% /usr/bin/ruby -e "$(curl -fsSL https://raw.githubusercontent.com/Homebrew/install/master/install)"

........
........
........

==> Installation successful!

==> Homebrew has enabled anonymous aggregate user behaviour analytics.
Read the analytics documentation (and how to opt-out) here:
  https://docs.brew.sh/Analytics.html

==> Next steps:
- Run `brew help` to get started
- Further documentation:
    https://docs.brew.sh
ひとまずこれで始められる。


